From my runBENrun project I have generated a lot of data; over 1.2 million data points in 2.75 years. It is easy enough to write SQL scripts to analyze the data and gain insight into the runs, however, trying to build meaningful maps that help me interpret my runs isn’t as easy. I have made plenty of maps of my running data over the past year, some good, some bad. In this post, I will explore a few different methods on how to best visualize a single 5k race dataset from my runBENrun project.
The Problem
With most GPS running apps and fitness trackers, you are often generating lots and lots of data. My old Nike+ watch collects a point every ~0.97 seconds. That means if you run a six minute mile in a 5k you can log over a 1000 points during the run. The GPS data collected by my Nike+ watch is great, and I can generate lots of additional derivative attributes from it, but is all that data necessary when trying to spatially understand the ebbs and flows of the run?
Software
I will be using PostgreSQL/PostGIS, QGIS and CARTO in this project. In my maps, I am using Stamen’s Toner Light basemap.
The Data
For this post, I am using a single 5k race I ran in November 2016, in Wakefield, Massachusetts. The race course loops around Lake Quannapowitt, and is flat and fast with several good long straightaways, and some gentle curves. I’ve run a couple races on this course, and I recommend it to anyone looking for a good course to try to PR on. I am also selecting this dataset because the course is a loop, not an out-and-back. Out-and-back running datasets are a lot harder to visualize since the data often interferes with itself. I plan on doing a post about visualizing out-and-back runs sometime in the near future.
In case anyone is interested, I have exported a point shapefile and a multiline shapefile of this data, which can be found on my github account.
Before We Starting Mapping…
What’s spatially important to know about this run? Beyond mile markers, speed is what I am most interested in. More importantly, how consistent is my speed throughout the run. I will add mile markers and the Start/Finish to the maps to give some perspective. I will also provide histograms from QGIS of the value and classification breakdowns to help give context to the map.
Let’s Make a Lot of Maps of One Run
Mapping all 1,117 Points – Let’s start with a simple map. When only visualizing the points I get a map of where I was when I ran. Taking a point about every second, the GPS data isn’t very clear at this scale.
 Is this a good running map? No.
Mapping Meters Per Second Bins using Point Data
Points on a map don’t tell us much, especially when the goal here is understand speed throughout the race. The next step in this project is to visualize the range of values in the Meters per Second (MpS) field. This is a value I calculate in my runBENrun scripts. The next set of maps will take a couple different approaches to mapping this point data, including visualizing the MpS data by quantile, natural, and user defined breaks.
Quantile Breaks
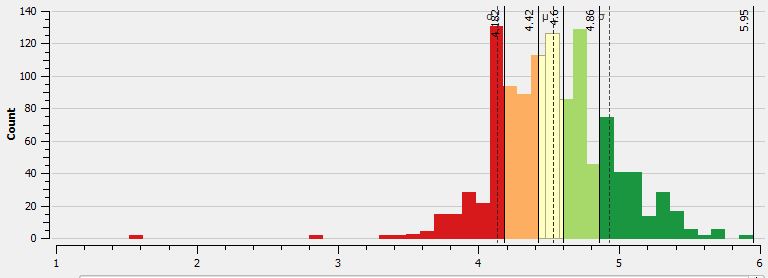
The first MpS map uses quantile breaks to classify the data. Since there is a tight distribution of values, quantile breaks will work (there are no major outliers in the dataset). In the following histogram from QGIS we see the distribution of values coded to the five classes. In all of the maps green equals faster speeds while red values are slower.
The map displays the points classified as such. What’s important to note from the point based map, is that since there are so many points in such a tight space, that seeing some type of meaningful pattern is tough. To the naked eye there are many “ups and downs” in the data. There are clear sections of the race where I am faster than others, but in other parts of the race a “slow” point is adjacent to a “fast” point. This pattern will show up in the next maps as well. I am looking into this noise and will hopefully have a post about understanding this type of variation in the GPS data.
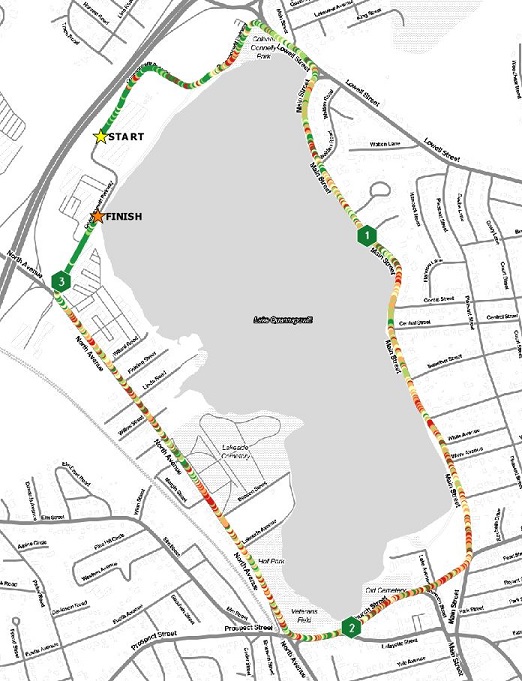
Is this a good running map? Not really. The data is busy; there are too many points to get a real perspective on how consistent the speed was.
Natural Breaks
The next map uses natural breaks classification scheme. When comparing the histogram using quantile breaks to the natural breaks, one will see that natural breaks algorithm puts fewer values into the lowest (or slowest) bin.
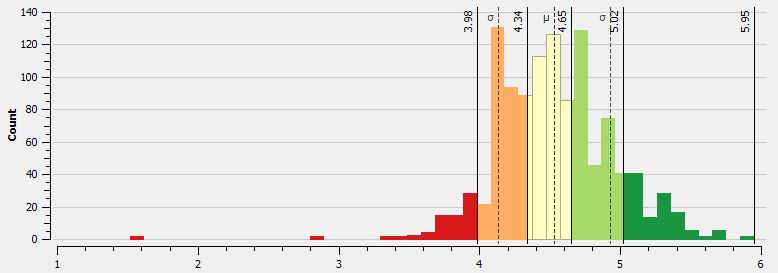
The difference in binning is apparent in the map. Overall, the reader is given the impression that this is a better run, since there is more non-red colors on the map. Without a MpS legend one wouldn’t know one run was faster than the other. Overall, the general speed patterns are better represented here, as I believe there is a better bins transition between the bins.
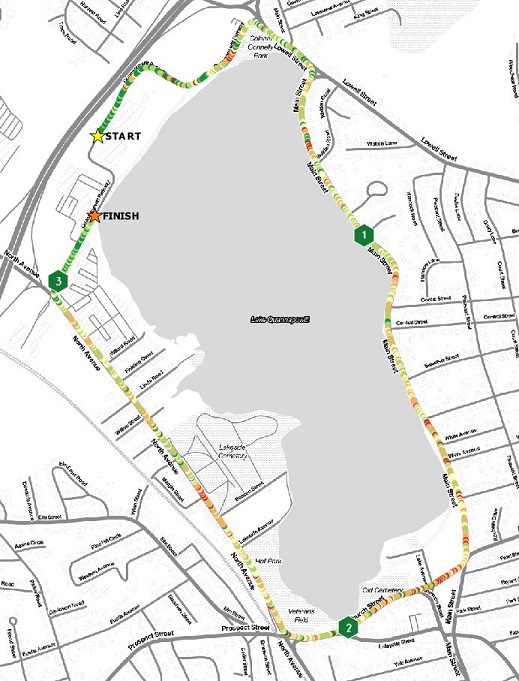
Is this a good running map? It’s better. The natural breaks classification works better than quantile breaks with this dataset, but there is still too much noise in the dataset. That noise won’t be eliminated until the dataset is smoothed.
Self Defined Classification – Ben Breaks
In this example, I wanted to set my own classification scheme, to create more friendly bins to the “faster” times. I call this classification scheme the “Confidence Booster.”
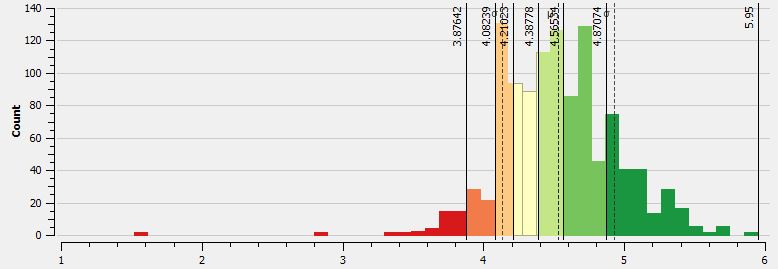
One can see that I have larger bins for the faster speeds, and really minimize the red, or slower bins. The resulting map has a smoother feel, but again, there is too much noise between the MpS values from point to point.
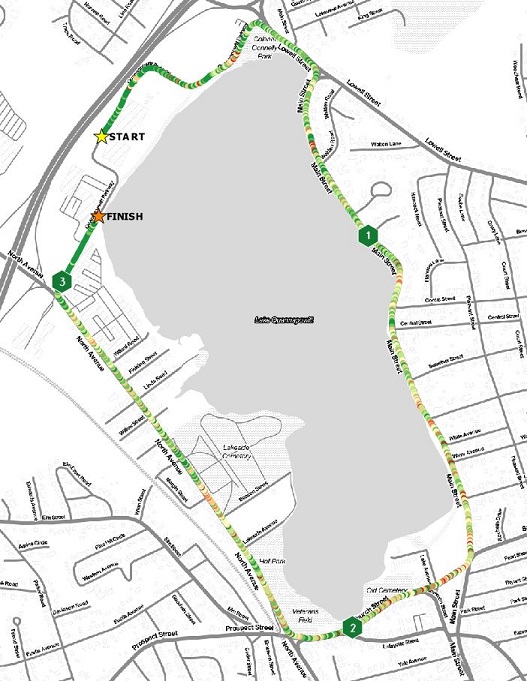
Is this a good running map? It’s not bad, but as with all the point maps, there is a lot of data to communicate, and at this scale it doesn’t work as well as I would have liked.
Overall, the point data, using every point in the dataset isn’t a good approach for mapping the run.
Mapping Multiline Data
Using my runBENrun scripts, I generated not only point geometries, but also multiline geometries (single line calculated between each sequential point). At the scale we are viewing these maps, their isn’t much visual difference between the point and line maps, which is understandable. The multiline datasets are much better utilized when one wants to zoom into a specific area or see the actual details of the route.
I generated the same set of maps using the multiline based data as I did with the points, so I won’t repeat the maps here. However, I will share a map of the multiline data loaded into CARTO, symbolizing the MpS value with the multiline data using a natural breaks classification.
Is this a good running map? Yes and No. The line data symbolized with natural, quantile, or self-defined breaks works better in an interactive setting where the user can pan and zoom around the dataset. However, the static versions of these maps have the same issues the point data maps do.
Mapping Multiline Data Aggregated to Tenth and Quarter Mile Segments
For this dataset (and almost all running datasets), visualizing every point in the dataset, or every line between every point in the dataset isn’t a good idea. How about we try a few methods to look at the data differently. The first approach is to smooth and aggregate the data into quarter mile and tenth of a mile segments.
Using PostGIS, I simply aggregated the geometry based the distance data in the table, and then found the average MpS for that span. I wrote the output to a table and visualized in QGIS.
Quarter Mile Segments – Quantile Breaks
Since there is less data to visualize, we get a much cleaner, albeit, dumbed down version of the race. There are clear patterns where I was faster than where I was slower (green=fast, red = slow, relatively speaking). The consumer of the map isn’t wondering why there was so much variation. I made this map with both natural breaks and my self-defined breaks, but the quantile classification gave the best view of the race.
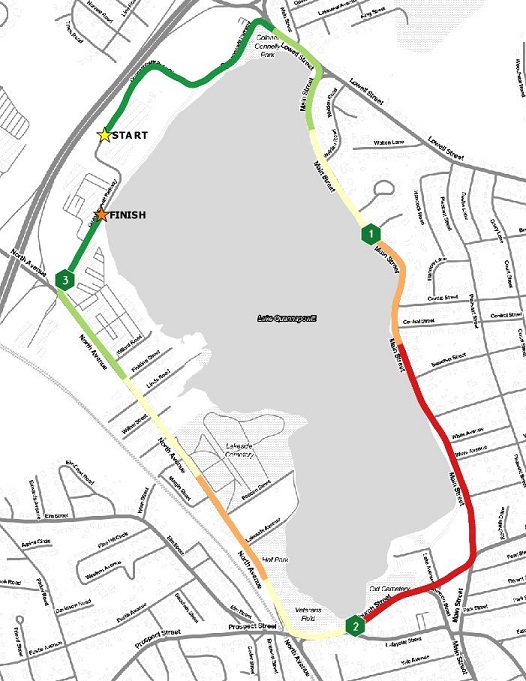
Is this a good running map? Yes, if you just want to know the general trends of how your race went, then this map will let you know that. My second mile, as always, was my worst mile. I traditionally struggle in mile two.
One Tenth Mile Segements – Quantile Breaks
How about comparing different aggregation approaches? Let’s look at the race broken into tenth of a mile segments using a quantile classification scheme. In this approach, there is more detail in MpS differences during the race than the quarter mile map. The color for the middle bin does get washed out in the map, so I should probably go back and fix that.
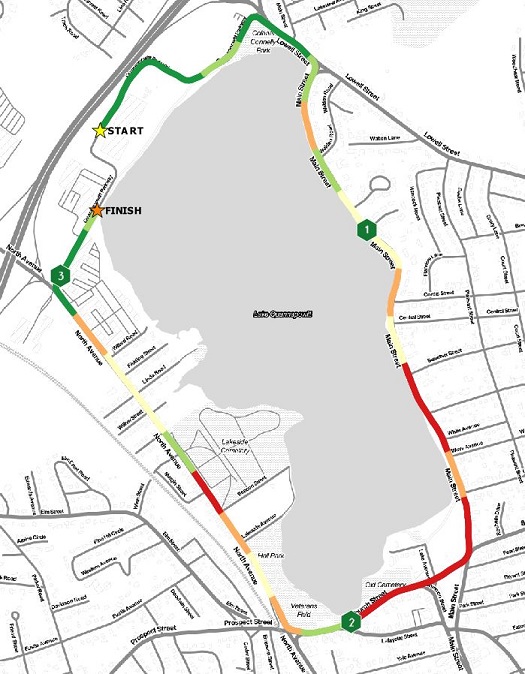
Is this a good running map? Yes. The general message – where was I fast and where was I slow – is answered and the data isn’t distracting, like it is in the point maps. A way to improve this visualization would be to add the actual breaks between tenth mile segments, and maybe a table with the time splits.
Using Standard Deviation and Average Bins
The last set of maps will visualize the race using some basic statistical measures – standard deviation and average.
Standard Deviation
The distribution of values are fairly compact. The resulting maps using the standard deviation bins reflect that.
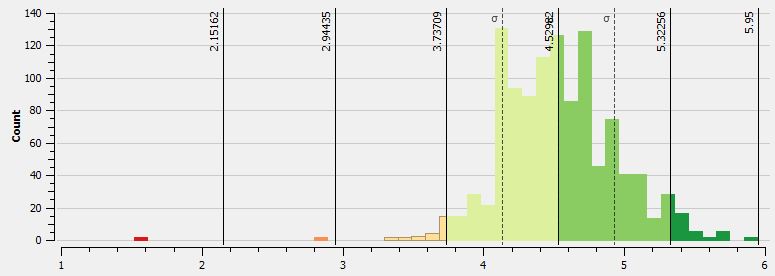
With the point dataset, MpS values classified using standard deviation, you actually get a pretty decent looking map. Since there are so few very fast or very slow MpS values, you don’t get many points in those bins extreme bins. This means that the color ranges fall more in the middle of the range. This map won’t tell you have fast or slow you were really going, but it gives you an idea of how well your run was relative to the rest of the race. For what I plan to do in a race, I would hope to see a majority of values in the +1 or -1 standard deviation bins. This would mean that I was pretty consistent in my MpS. Ideally, I would also see values in the higher plus standard deviation bins towards the end of the race, as I really try to pick up the pace.
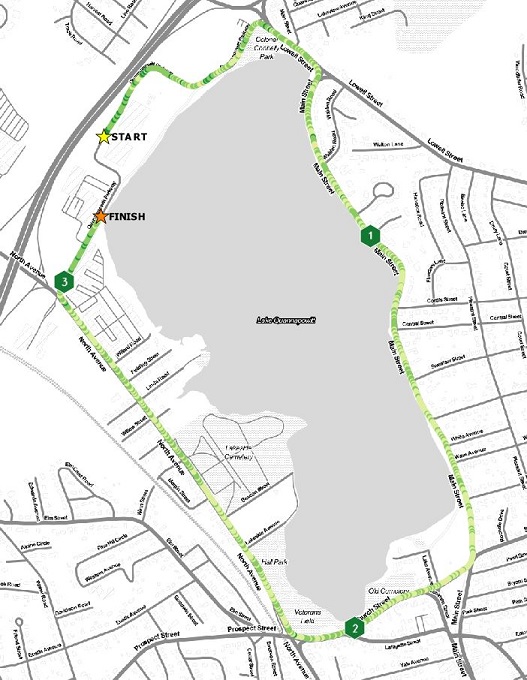
Is this a good running map? If you know what you are looking at, then this map can tell you a lot about your run. However, if you aren’t familiar with what a standard deviation is, or how it is mapped, then this might not be a good approach.
Average Values
The last map for this post is simply mapping those points that are above, at, or below the average MpS for the race. In this race, my average MpS was 4.52 (For reference, Mo Farah won the 2016 Olympic 5k in 13:03, or 6.39 MpS!). I created three classes – green – points with an above average MpS, yellow – points that were average, and red – points that had a below average MpS. The view of the run isn’t that bad with this approach. The user get a fairly clear indication of relative speed during the race, without all the noise from previous attempts to classify the data. Using the average value here though only works because the range of values is fairly tight. If there was a wider swing in values, this approach might not work.
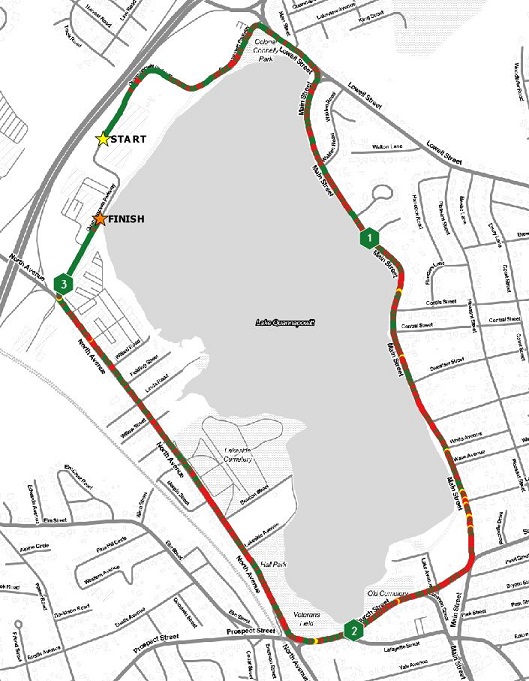
Is this a good running map? Yeah, it’s not that bad. The colors are a little harsh. In this case it works, but depending on the range of values, mapping compared to the average may not work. Another test would be to compare values against the median.
What map was the best approach?
In the end, what map was the best approach to visualizing the data from the race with the goal of best understanding my MpS? I had two maps that I think met the requirements:
- Quarter Mile Segement Quantile Breaks – smooth transitions between classes, easy to view, and informed readers of the general race speed trends
- Standard Deviation – good approach if you know what a standard deviation is, and if your data is compact (don’t have huge swings in value). This approach gives the reader a clear indication of how they were doing relative to the rest of the run, without worrying about the individual MpS values.
There is value in all the maps, and with a little work, they could be improved as well. However, these two maps were my picks.
What’s Next?
I actually made another 10 or so maps when working on this blog, including maps using proportional symbols, incorporating more data smoothing, and some ideas about flow maps. The next steps will include exploring those visualization methods with the goal of getting them into the blog.
Have any other suggestions? Send me a note on twitter @thebenspaulding!
